Importing CSV file is primarily intended to help new users who are migrating over from their current app into Bluecoins. This provides a quick and easy process to perform mass importation of transactions without the need to manually enter each records.
How To Create CSV File:
To import transactions from Excel, save the file into CSV format. In Excel, File > Save As > File Type > csv (comma separated values).
Import your Excel csv file into Bluecoins:
- Save your Excel csv file into any location in your phone
- Go to Settings > Data Management > Excel CSV Import
- Click Import transactions from Excel and navigate to and select your csv file.
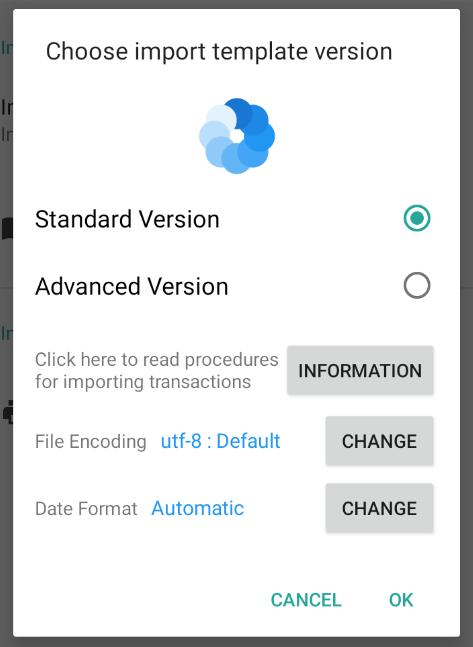
Import Template Dialog
Bluecoins supports two modes of CSV import template- namely Standard and Advanced version.
Standard Version
This is the standard template for importing the basic transaction requirements into Bluecoins. Most users will likely only need to use this template.

Advanced Version
- The advance template includes two additional columns, namely Currency and Conversion Rate. Here, users can specify the currency as well as the conversion rate that will be assigned to the individual transactions to be imported.
- As a side note, the advance template may be updated more frequently to provide additional configuration of the import file, while leaving the familiar standard template intact.

File Encoding
UTF-8 will be used as default encoding when importing csv file. If you are using a different encoding for your csv, click the change button to select a different one.
Sample Templates
- Standard Version – https://drive.google.com/file/d/1p6r3nH-cJj3v0-aAtE1NAg9UASHmX_3r/view?usp=sharing
- Advance Version – https://drive.google.com/file/d/1rpGg48aZLrhIYRK3JK46M8REOaqJf0C6/view?usp=sharing
Column Descriptions
Transaction type
- For Expense Transaction Type, use the letter “e” – without quotes
- For Income Transaction Type, use the letter “i” – without quotes
- For Transfer Transaction Type, use the letter “t” – without quotes
- For transfers, create two rows in your CSV file.
- The first row is the sending account. Make the 1st row a negative amount.
- The second is the receiving account. Make the 2nd row a negative amount. It must be the same amount.
Date
- Date (the recommended format is 3/31/2016 or 3/31/2016 15:30)
- If you are using a different date format for your csv, click the change button as shown above in the Import Template dialog to select a different one.
Item Name
Item or Payee name
Amount
Important: Do not include commas and use period (.) for decimal value. For income and expense, it is not needed to set the amount sign to positive or negative.
- Income
- Bluecoins will automatically apply a positive sign to Expense.
- If the amount column contains 123.45, the amount will be imported as 123.45
- Expense
- Bluecoins will automatically apply a negative sign to Expense.
- If the amount column contains 123.45, the amount will be imported as -123.45.
- If the amount column contains -123.45, the amount will be imported as 123.45
- reverse expense, e.g., reimbursements or refunds
- Transfer
- The first row, which is the sending account, should have a negative sign.
- The second row, which is the receiving account, should have a positive sign.
Amount with a different currency (Advance Mode)
- The amount value must be equal to the default currency.
- The conversion rate must use the conversion formula of 1 Default Currency = X Foreign Currency where X is the conversion rate. For example:
- Default Currency = USD
- Foreign Currency = PHP
- Exchange Rate : 1 USD = 50 PHP
- Amount = P500
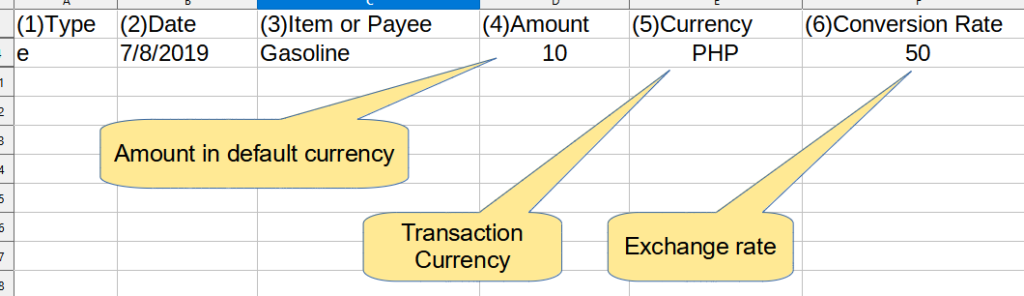
- Amount Column = 10 (amount in default currency or 10USD, not 500PHP)
- Currency Column = PHP
- Conversion Rate Column = 50.0
Currency (advanced template only)
- The currency for the transaction
Conversion Rate (advanced template only)
- The conversion rate must use the conversion formula of 1 Default Currency = X Foreign Currency where X is the conversion rate.
- For example, if default currency is USD, and the transaction currency is PHP:
- 1 USD = 50 PHP, therefore, the conversion rate column should be 50.0
Parent Category
Parent Category (e.g. Utilities) -will be created automatically if unavailable
Category
Category (e.g. Electricity) -will be created automatically if unavailable
Account Type
Should be any of the available asset types in the app (Bank, Cash, etc.). Will be created automatically if unavailable
Account
Account (e.g. Citibank, Chase Bank, Wallet) -will be created automatically if unavailable
Notes
Notes (Optional). Any notes about transaction
Label
Labels (Optional). To import multiple labels, separate labels by space.
Status
Status (Optional). Imported transactions will have no status (or uncleared) by default. This column can be any of the following letters:
- R – reconciled
- C – cleared
- (blank) – leave blank for no status
Split
Imported transactions will not be part of a split transaction by default. See the Import Template above for a sample of how to setup a split transaction import. This column can be any of the following:
- s – type s for split transaction
- (blank) – leave blank for regular transaction
Notes:
- Split transactions row must be grouped together and must have the same Item Name
- Using different labels for individual split items is not supported. Only the first row labels will be used for every split item.
- Using different status for individual split items is not supported. Only the first row status will be used for each split item
Old Video
Here’s a neat (but very old) video about this feature: