Please follow us on Facebook ,Twitter or Google+ for real-time updates and announcements.
Introduction
![]() BLUECOINS is an incredibly fast & powerful app for tracking & planning where your money goes, allowing you to easily plan a budget, never forget a bill & spend money with confidence! With tablet support, online sync (Google Drive or Dropbox) & multi-currency support, you have instant access to your personal finance data on any device, anytime, anywhere! Read more about Bluecoins’ Key Features.
BLUECOINS is an incredibly fast & powerful app for tracking & planning where your money goes, allowing you to easily plan a budget, never forget a bill & spend money with confidence! With tablet support, online sync (Google Drive or Dropbox) & multi-currency support, you have instant access to your personal finance data on any device, anytime, anywhere! Read more about Bluecoins’ Key Features.
How To Support Development
As an independent developer, we take pride on Bluecoin’s quality, overall performance and customer service. To provide world-class quality app and service to you all, here are some ways you can support:
- Please give the app a 5-star ⭐⭐⭐⭐⭐ rating on the Playstore. It’s a simple acknowledgement that will go a long way in supporting the app. (Rating poorly to gain attention for a request will be not considered. We prioritize users who truly support the app)
- If you like to help support language translation, please visit the following link: Language Translation
[bg_collapse view=”button-blue” color=”#ffffff” icon=”arrow” expand_text=”Show More” collapse_text=”Show Less” ]
- Premium upgrade- as powerful as Bluecoins standard features are, there’s even more to expect on the premium. Read more- Link: Premium vs Standard Version
- Try some of our other apps on the Playstore.
- Contribute to translating Bluecoins to other languages. Link: Language Translations
- If Bluecoins has changed your life, please consider donating to support development or simply just treating your developer a pack of beer
- In the app, go to Settings > Support > Donate (Available to Premium users only)
[/bg_collapse]
Frequently Asked Questions (FAQ)
Looking for quick answers, check out the most Frequently Asked Questions.
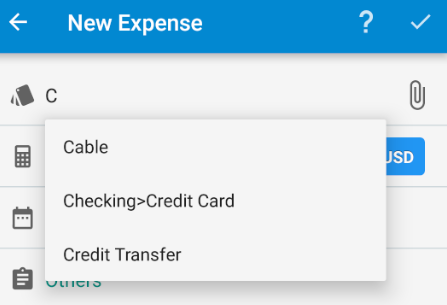
How To Make A Transaction
For a quick guide on how to make a transaction in Bluecoins, please read the guide below:
Link: Transactions
App Navigation
Navigating around Bluecoins is pretty straightforward. Along the top are the different Sliding Tabs. Sliding from the left edge of the screen towards the right opens the Navigation Drawer. The section Sliding Tabs & Navigation Drawer below describes the different navigation items underneath them and their descriptions.
Sliding Tabs
The Sliding Tabs is the main navigational area of Bluecoins. Here, you will be presented with various tabs- namely the Main Dashboard, Transactions, Reminders, Budget Summary, Categories and Accounts (or Balance Sheet). This tabs can be configured or re-ordered under Settings (see Tabs Customization). The section below further explains what this tabs are.
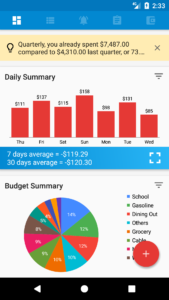
Main Dashboard
The Main Dashboard tab displays the different finance cards in a vertical scroll-able list. This is the starting screen when you launch the Bluecoins app. Additional Reading- How Bluecoins Help You Evaluate Your Financial Statements
Latest Insights
Your smart assistant that will give you meaningful insights as it analyzes your finance data
Daily Summary
A snapshot of your daily expense, and average spending for last 7 and 30 days.
Budget Summary
Summary of all your expenditures that are grouped into categories and compared against a budget you set for a set frequency of time
Net Earnings Summary
Summary of all your income, total expenditures, and your net earnings (income minus expenditures).
Credit Card Summary
Summary of your credit card accounts showing your spending compared to your remaining credit limit. To learn more about Credit Card management within Bluecoins, please read the following guide:
Link: Credit Card Management
Net Worth Summary
Also known as your personal balance sheet- summary of your assets (what you own), your liabilities (what you owe) and your net worth (assets minus liabilities).
Cash Flow Summary
Your cash flow measures your cash inflows and outflows in order to show you your net cash flow for a specific period of time.
To learn more about Cash Flow, please read the following guide:
Link: Cash Flow
Transactions
The Transactions tab displays a scroll-able list of all of your transactions. Clicking on any one item will open the transaction for editing. Long pressing any transaction will open the action mode toolbar. In this mode, you can select or multi-select items for deleting, adding labels, copying and pasting.
![]()
Reminders
The Reminders tab displays a scroll-able list of all of your reminders. Clicking on any one item will open the reminder for editing. Long pressing any reminder will open the action mode toolbar. In this mode, you can select or multi-select items for deleting.
Budget Summary
The Budget Summary tab displays a scroll-able list of your category expense and income compared to their budget settings.
Net Earnings
The Net Earnings tab displays a scroll-able list of your categorized expense, income and net earnings (or losses) on a selected period (this month, this quarter, this week, etc) compared to this previous period (last month, last quarter, last week, etc…)
Balance Sheet
The Accounts or Balance Sheet tab displays a scroll-able list of your account balances as of today and compared to a previous point in time (end of last month, same time last month, end of last year, etc…) Read more about balance sheet in the link below:
Link: Balance Sheet
Items Summary
The Items Summary tab displays a scroll-able list of your spending and income organized by title (or payees, item name, or whatever you put in the title input field based on a selected period (this month, this quarter, this week, etc) compared to this previous period (last month, last quarter, last week, etc…)
Labels Summary
The Labels Summary tab displays a scroll-able list of your transactions organized by labels. Click on a label to display all transactions belong to that label. Like all other tab reports, this list supports advance filtering by accounts, categories and time frame.
Navigation Drawer
Sliding from the left edge of the screen towards the right opens the Navigation Drawer. The navigation drawer is a convenient way of quickly navigating to other functional areas of Bluecoins.
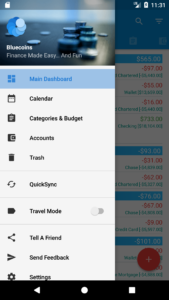
Main Dashboard
Link: Main Dashboard
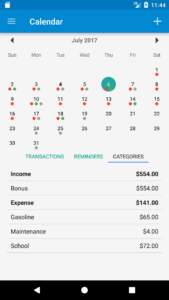
Calendar
The Calendar screen displays a monthly calendar. Clicking on a date on the calendar will display the transactions, reminders and the categorized spending and income for that day.
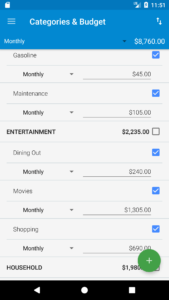
Categories & Budget
The Categories & Budget setup screen is where you can edit or create new categories and assign budget to categories or at their parent categories. Each category can be budgeted into different time periods- namely weekly, bi-weekly (or every 2 weeks), monthly, quarterly and annually.
Assigning budget to Parent Categories- budgeting at the parent category level is a convenient way of managing budget at a higher level without the need to individual track individual categories underneath it. For example, you may have categories for breakfast, lunch and dinner but you do not want to set individual budgets for each of them but rather at their parent category Food for example. Checking the parent category instead of the category allows you to make this type of budgeting setups.
For more information on Categories and Budgeting, please read this guide:
Link: Categories & Budget
Accounts
The Accounts setup screen is where you can edit or create new accounts. Accounts are classified into Assets or Liabilities at the highest level,and underneath them are Account Groups. Listed below are the structure of account groups in Bluecoins:
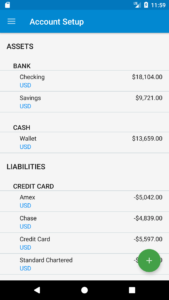
Assets
- Cash
- Foreign Assets
- Investments
- Properties
- Receivables
- Other Assets
- Virtual Accounts
Liabilities
- Credit Card
- Foreign Liabilities
- Loans
- Mortgages
- Payables
- Other Liabilities
Label
Clicking this navigation drawer item takes you to the labels management screen. There you can create new labels, edit or delete them. When you edit or rename a label, the new name will immediately be applied to all transactions having that label. Also, deleting a label will remove it from all transactions having it.
Trash
The trash is a scroll-able list of your deleted transactions. Trash is like a safety place for all your deleted transactions where you can take actions into them. You can restore a transaction that was already deleted or permanently delete it, which makes it unrecoverable. Clicking the empty trash menu button at the top permanently deletes all the deleted transactions.
Travel Mode
Link: Travel Mode
Tell A Friend
Clicking this menu item will launch your phone’s share dialog screen, where a link to Bluecoin’s Google Playstore Page will be included. Use this to share Bluecoins to your friends via Email, Facebook, Twitter and other social media applications you have installed on your phone. This is a great way to support the development of Bluecoins.
Send Feedback
Clicking this menu item will launch your email app where you an write an email directly to Bluecoins support. Use this to report any feedback, issues or suggestions you may have.
Settings
Clicking this menu item opens the Settings screen where you can adjust the configurable settings and options of Bluecoins. See the section below for more details on the Settings screen.
Settings
The Settings screen of Bluecoins is where you can configure the various design and functionality elements of Bluecoins. Bluecoins is a very flexible app, and many of it’s key features and functionalities are can be customized to your preferences. The main settings are grouped under Localization, General and Data Management. The following sections describes these settings.
Localization
This area of the settings is where you can set the Bluecoins app to adapt to your geographical settings and preferences. Bluecoins by default tries to automatically set this to your local settings, but you can still adjust them here to suit your needs as necessary.
Language Preference
Click to change the language of the app. Link: Language Translations
Currency Setup
Main article: Multi-Currency Support
Default Currency
Click to change the default currency of the app. Bluecoins supports all international currencies and symbols.
To learn more about Bluecoins multi-currency support, please read the following guide:
Display Currency
Check to display all amount values with currency symbol and formatting. This is ON by default.
Color Amount Values
Check to display amount values with color formatting.
- RED– negative values such as expenses
- GREEN– positive values such as incomes
- BLACK- zero values
Negative Number
Click to select how you want the negative values to be formatted. Two options are provided:
- -100
- (100)
Decimal Digits
Click to select how many decimal digits you want the amount figures to have. The options are 0, 1, 2, 3 and 4.
Decimal Format
Click to select how you want the thousands separator and the decimal symbol to be formatted. There are five options, the default is automatic, which is localized based on your current location:
- Automatic- based on location
- 1,234.56
- 1.234,56
- 1 234.56
- 1 234,56
Date Settings
Main article: Date Settings
Click to configure your date format settings and preferences. Additional Reading- Link: Date Settings
Start day of the month
Change the default start date of the month which will be used in the graphs and the reports.
Start day of the week
Change the default start day of the week which will be used in the graphs and the reports.
Start month of year
Change the default start month of the year which will be used in the graphs and the reports.
Date format
Change the date format to suit your needs. All the available date formats internationally are available. The default is Automatic, Bluecoins will apply the localized date formatting based on your location as reported by your phone settings.
Time format
Change the time format to suit your needs. All the available time formats internationally are available. The default is Automatic, Bluecoins will apply the localized date formatting based on your location as reported by your phone settings.
General
This area of the settings is where you can customize Bluecoins look, appearance and notifications. Use this setting to change Bluecoins theme, change your widget settings, customize your tabs, main dashboard, transaction screen and set your notification preferences.
Appearance
Main article: Appearance Settings
Theme
Use this setting to change your Bluecoins theme. Link: Standard and Black Theme
Color Intensity
Use this setting to adjust the color intensity of the graphs and charts displayed everywhere within the app. There are 5 numbered settings. Higher values will make the colors more vivid while lower colors will make the colors lighter and less saturated.
Disable chart animation
Use this setting to disable animation of charts on dashboard cards and chart reports. This may help improve the screen responsiveness for slower or older phones.
Widget Settings
Hide logo- use this setting to hide the Bluecoins logo on all Bluecoins widget.
Semi-transparent background- use this setting to make the widget semi-transparent.
Use lighter text- use this setting to make the widget text lighter instead of darker. Combined with semi-transparent setting, this works great on dark wallpaper background.
Tabs Customization
Main article: Tabs Customization
Use the Tabs Customization setup screen to configure your sliding tabs. In this setting, you can reorder the tabs by dragging the tabs to their desired position. You can also hide any tabs you want by turning off the tab switch.
Main Dashboard
Use the Main Dashboard setup screen to configure your dashboard cards. In this setting, you can hide any cards you want by checking off the card checkbox. Unlike the Tabs Customization screen, you cannot reorder the cards in this setting. To reorder the cards, go to the Main Dashboard tab, long press any card and use drag and drop to reorder the cards.
Transaction Setup
Main article: Transaction Setup
Autocomplete
Use this setting to set what field parameters will be filled up when using Autocomplete:
You can decide if you want autocomplete to re-use amount, category, account, notes and/or labels when creating a new transaction.
Title
Use this setting to to assign the default Title in case you do not include one. Read more in the link below:
Link: Unnamed Transactions
Default Expense Category
Use this setting to select your default expense category that will be used when creating a new transaction.
Default Account
Use this setting to select your default account that will be used when creating a new transaction.
Remember Last Currency
Enable this setting if you want Bluecoins to start a new transaction with the latest currency that you used.
Remember Exchange Rate
Enable this setting if you want Bluecoins to apply the last exchange rate you used for the selected foreign currency on a new transaction if it has been used in the past. If not, Bluecoins will download it from the Internet.
Pop-up Calculator
Enable this setting if you want the calculator to pop=up immediately when adding a new transaction.
Show Time
Use this setting if you want the time to be visible or hidden on the transaction setup screen.
Expanded Notes
Use this setting if you want to show just the note icon or the notes snippet on the Transactions tab.
Expanded Labels
Use this setting if you want to show just the labels icon or the labels assigned to to the transaction itself on the Transactions tab.
Phone Notification
Reminders
Main article: Reminders Setup
Daily Reminders
Use this setting if you want to be notified if no transactions has been entered within the last 24 hours. Use the Set Time setting next to it to control what time of the day you like to be notified.
Due Reminders
Due Bills & Reminders– Use this setting to enable phone notifications for due bills and reminders. Link: Reminders- Take Control of Your Busy Life.
Credit Card Reminder– Use this setting to enable phone notifications when credit card bills are due.
Additional Notification– Use this setting to set additional notifications in addition to notifications on due dates for bills and credit cards (a day before, 2 days before, a week before, etc…)
SMS Banking Notification
Main article: SMS Banking Notification
Data Management
This area of the settings is where you can setup Bluecoins data management settings- including backup and restore settings. Use this setting to setup your local and cloud backups and restore from your backups, import your data from Excel (csv) and export your data into Excel (csv). This setting also includes features to set password security and reset your data.
Local Backup
Main article: Local Backup Settings
Automatic phone backup
Use this setting if you like the app to automatically backup your data at 8AM everyday. The backup will be stored in your default backup location and the filename will bear the date and time of the backup.
Default backup location
Use this setting to set the default backup location. By default, the backup will be stored in Internal Storage/Bluecoins. We recommend that you do not change this location or if you do, do not change the backup location an external SD card location.
Backup to phone storage
Use this setting to perform an immediate manual backup of your data to your default backup location. Note: You will be asked to provide storage access permission if this permission has not yet been granted.
Restore from phone storage
Use this setting to restore a backup on your default backup location. You may use this if you are reinstalling the app, or have reset your data and want to restore from one of your backups. Important: This will overwrite your current data. Note: You will be asked to provide storage access permission if this permission has not yet been granted.
Excel (csv) Data
Main article: Excel (csv) Data Settings
Import Transactions from Excel
Use this setting to import transactions from Excel (csv format). Link: How to import transactions from Excel
Export Data
Use this setting to export your data in Excel (csv) format.
Export/Email transactions– use this setting to export or share the transactions data displayed on the Transactions tab in Excel (csv) format.
Export/Email reminders– use this setting to export or share the reminders data displayed on the Reminders tab in Excel (csv) format.
Export/Email balance sheet– use this setting to export or share the balance sheet data displayed on the Accounts tab in Excel (csv) format.
Online Sync
Main article: Online Sync
Choose Backup Provider
Use this setting to set your cloud backup provider. Bluecoins supports either Google Drive or Dropbox as cloud backup options. Read more- Link: Backup and Sync Server (Google Drive and Dropbox).
Link Google Drive (or Dropbox)
Use this setting to link your backup provider. You will be asked to authorize and give permission to allow Google Drive or Dropbox to access the Bluecoins app.
Backup to Google Drive (or Dropbox)
Use this setting to perform immediate manual backup of your data to your cloud backup provider. Note: You will be asked to provide storage access permission if this permission has not yet been granted.
Restore from Google Drive (or Dropbox)
Use this setting to perform immediate restoration of your data from your cloud backup provider. You may use this if you are reinstalling the app, or have reset your data and want to restore from one of your backups. Important: This will overwrite your current data. Note: You will be asked to provide storage access permission if this permission has not yet been granted.
More Reading Links: Backup and Sync Guide
Data Security
Main article: Data Security
Password
Use this setting to enable 4-digit PIN security for your device. In addition, if your device has fingerprint sensing and have registered fingerprint password in your device settings, Bluecoins will recognize this and use that to unlock the app as an alternative to the 4-digit PIN password. Important: make sure you do not forget your PIN or access to your data will be impossible.
Reset Data
Use this setting to reset your Bluecoins data. You will be prompted to confirm the reset of your data by typing the word BLUECOINS on the next dialog.
About
This area of the settings is for general information about the app, version number, social links as well as link to upgrade the app into premium version.
Latest News & Help
Social Media Links– Get the latest and real-time updates from Bluecoins social media pages (Facebook, Twitter, Google+ and Official Website).
User Guide– Clicking this setting will take you to the Bluecoins user guide on its official website.
Change Log– Clicking this setting will take you to the Bluecoins change log on its official website.
On Premium Version– Clicking this setting will take you to the comparison between Standard & Premium version on its official website.
Upgrade to Premium
Use this setting to upgrade the app to the Premium Version. Learn more about the benefits of upgrading to premium. Link: Premium vs Standard Version
App Version
This will show the current Bluecoins app version installed on your phone. To know if a Bluecoins update is available, visit the Bluecoins app page on the Google Playstore. Link: Bluecoins on Google Playstore
Change Log
The app updates itself frequently via the Google Playstore to add more functionalities and features, improve performance, and resolve any issues that maybe encountered and reported by its users. Check out the details of the updates on the link below:
Link: Change Log
About App Permissions
Bluecoins requires minimum permission requirements from your phone. To learn more about the permissions requested by Bluecoins, please visit the following link: